Posts

Showing posts with the label Crafts

Krampus Custom Action Figure

Image
If you're reading Mainlining Christmas, you likely knew who Krampus was even before he played a major role in a pair of surprisingly great horror movies last year. I'd love to see decent collectibles from one or both of those movies, but no one's stepped up to produce action figures to date. So I decided to try making my own. This is a Funko Magic: The Gathering Ajani Goldmane action figure. I picked this up about a year ago when it was on clearance (I want to say I spent six or seven bucks on him, but I really don't remember). I loved the sculpt on the body, but I thought the head was awful. Still, I bought him on a whim, in the off chance I'd think of something to do with him. I'm glad I did - there aren't a lot of action figures out there with triple-jointed legs. And this head belongs to a build-a-figure Absorbing Man from Hasbro's Marvel Legends line. It's actually one of two heads I have for this character - the other

Craft Kit: Creatology Christmas Color and Bake

Image
Here's a not-so-secret fact about me: I'm a sucker for cheap craft kits. We picked up these kits at Michael's, and I think they were even a bit cheaper than the $1.00 each they're marked at. Each kit comes with a metal suncatcher frame and four tubes of tiny plastic crystals. The directions are on the back of the cardboard piece. It didn't take long to fill the candy cane, but the snowflake took more time because of all the little fiddly bits. It was slightly annoying because I got most of the way through the snowflake when I realized that one of the little arms didn't sit flat, and I was worried about plastic oozing out under the edge when it baked. So I gently bent that arm a tiny bit, but then had to start over.  I only used less than half the provided crystals. It's very difficult to tell, especially with the small sections, how much is enough, vs. too much. The instructions only say to 'Pile in the c

Beneath the Tree: Creatology Christmas Eve Foam Kit

Build your own 3D model of frustration with Creatology's Christmas Eve foam kit!

Beneath the Tree: Creatology Foam Deer Kit

What better way to celebrate the magic of Christmas than by mounting the severed head of Comet to your wall?

Craft: Angel Re-Paint: Devils

Image
I know it's a bit of a cheap shot, but I spotted these resin cherubs at a yard sale and had to have them. I added little horns with Kneadatite, and painted the horns a base coat to match the figure. Here's an in-progress shot: More paint all over, and... ta-da: These are pretty small, so fine detail wasn't easy. I had a lot of luck using watered down dark colors to give a bit of dimension. They came out pretty nice.

Craft: Angel Re-Paint: Horrors

Image
Let me preface this one by saying that I'm not sure the final product is more horrifying than the original figurines.  Here's what I bought: Scary, right? I added some sculpture with Crayola Model Magic. This was a bit of an experiment, but it worked okay. I had to use super glue to reattach the dried pieces to the little ceramic figures, though. After some layers of paint and gloss, here's the final results: Aww, now they're cute little tentacled monstrosities from beyond space!  Much improved, I think.

Craft: Angel re-paint: Vampire

Image
After I had so much fun last year re-painting angels into geek icons , I thought this year I'd create a few monsters.  I bought this little statue (just under 4") at a thrift store. Here's the before pictures: Really all I did to this was clean it and repaint it. The white wash on her skin looks better in person, but the rest of it photographed well.  Back view:

Craft: Archangel Statue

Image
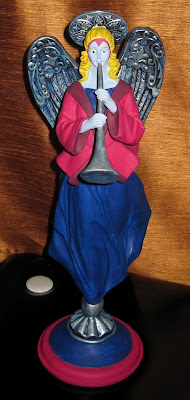
One more Angel before I leave you for the year. This one was actually the inspiration for the whole project... I bring you, Archangel! (Somewhat gender-bent) Like the others, this project started out with a statue I bought at a craft store. I sanded it down and primed it with my plastic-friendly spray primer: The next step was painting all the silver areas. I got the depth of color I wanted by starting with a coat of dark blue, purposely dark in the cracks and rubbed partially off of the raised designs: The silver got the reverse: only lightly in the depths and bright on the high parts. Then the rest of it needed paint. A good deal of paint later, and I'm very happy with the finished product.