Posts

Showing posts with the label Crafts

Craft: Phoenix Angel Ornament

Image
I'm getting more interpretive with the angel motif around here. Isn't she pretty? Here's what she started out like: I added Kneadatite over the word "Faith", and then I added some extra flames to her hair and wings: A light sanding, then plenty of paint, and she's evoking a very different look. I didn't manage to get in all the cracks as much as I'd like, but maybe I'll do a little touch-up when I have more time. I went over all the non-flesh colored parts with white first, then chose the best bright colors I could mix. The fire wings are many layers of oranges, reds and gold. Here's a shot for scale: I thought about going back in with a symbol or something, but I like that it's not completely obvious who she is. She came out pretty nice, and she's probably not going to eat your planet today. 

Craft: Weeping Angel Ornament

Image
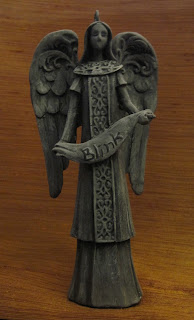
My first angel project is complete! (Well, she technically needs a coat of sealant, but it hasn't been dry enough to take her outside to spray her.) And yes, she's not currently hiding her face, but her eyes are closed, and I liked the Weeping Angels best when they were about implied danger. I bought three shiny angels this year for nefarious purposes: Here's a closer shot of the one for this project: I bought it very cheap on sale at a craft store. First I gave her a decent sanding, but didn't go overboard, since the dust created by the resin she's made of couldn't be good to breathe in. She got sprayed down with plastic-friendly primer next. I could still see "Hope" a little too clearly on her banner, so a little Kneadatite epoxy putty took care of that: And all that was left to do was paint. I first painted her all over a sort of medium gray, and then just kept going over her, adding darker grays to the inset p

Craft: Beaded Candy Cane Kit

Image
I bought this kit last year, really cheap: And then I forgot to take a picture of the pieces in progress. Oops. The kit came with a bunch of red and clear glass beads, a long piece of wire and some silver thread, I suppose for making ornament loops.  The instructions were slightly confusing, but boiled down to:  Cut two long pieces of wire. Thread one with red beads and one with clear. Fold them in half and twist together at the half-way point. Twist all the way along so it looks pretty. Use pliers to bend the ends of the wire under. Bend into cane shape. So I made a bunch of canes: And they were fun to make, but they actually look kind of tiny and lame on the tree: And then I thought, I have all these beads and wire left over. So I cut two really long pieces of wire, and added beads and twisted them together as though I were making a giant, ill-proportioned candy cane. Only this time I left some wire on each side and added jump rin

Make Your Own Hallmark Keepsake Ornaments

Image
Okay, I think we can all agree that Hallmark makes some cool Christmas ornaments. If you don't agree with this statement, then you probably haven't been to a Hallmark store in a while, which really isn't something you need to be embarrassed about (in fact, it's a sign of good character). But, like it or not, Hallmark produces some extremely awesome pop-culture ornaments. Unfortunately, they charge a crap load of money for the things. We're talking $17 for the "cheap" ones and $35 if you want something with lights and music. Or you could make your own, in just three easy steps. 1. Go to Toys R Us (or Walmart, Target, or any other large, corporate owned superstore) and buy some toys. It doesn't really matter what you buy, so long as it's small, from a recognizable property, and isn't too expensive. Here are several examples I found lying around my apartment. You don't have to worry about being consistent in terms of style, size,